Credit Card View In Flutter.
A couple of days prior, I was perusing LinkedIn when I ran over a pleasant Credit Card Entry Form for web and mobile devices. I chose to accept that as a test and implement it utilizing Flutter.
With accommodation at the forefront, numerous mobile applications are integrating a payment alternative, and a large portion of them uphold credit or debit card payment. So we think of a package that permits you to add a CreditCard UI to your application effortlessly.
In this blog, we will explore the Credit Card View In Flutter. We will see how to implement the Credit cards UI easily with the Card detection using the flutter_credit_card package in your flutter applications.
Flutter Credit CardImplementationCode ImplementCode FileConclusion
Flutter Credit Card**:**
A Credit Card widget package, uphold entering card details, card flip animation. A Flutter package permits you to effectively implement the Credit card’s UI easily with Card detection.
This demo video shows how to create a credit card in a flutter. It shows how the credit card will work using the flutter_credit_card package in your flutter applications. It shows card detection, validation, animation, and dialog box. It will be shown on your device.
Implementation:
Step 1: Add the dependencies
Add dependencies to pubspec — yaml file.
dependencies:
Step 2: Import
Step 3: Run flutter packages get in the root directory of your app.
Step 4: Enable AndriodX
Add this to your gradle.properties file:
How to implement code in dart file :
You need to implement it in your code respectively:
Create a new dart file called credit_card_page.dart inside the lib folder.
First, we will add CreditCardWidget():
CreditCardWidget(
  cardNumber: cardNumber,
  expiryDate: expiryDate,
  cardHolderName: cardHolderName,
  cvvCode: cvvCode,
  showBackView: isCvvFocused,
),
In CreditCardWidget() has some required fields that cannot be null, such as cardNumber means the user can add our card number for card detecting, expiryDate means the user can add our card expiry date in a month and year format, cardHolderName means the user can add our name of the person on the front of the credit card*,* cvvCode means the user can add our cvv number is a 3-digit code printed at the back of a credit or a debit card*,* showBackView means true when you want to show cvv(back) view.
CreditCardWidget(
        cardNumber: cardNumber,
        expiryDate: expiryDate,
        cardHolderName: cardHolderName,
        cvvCode: cvvCode,
        showBackView: isCvvFocused,
        cardbgColor: Colors.black,
        obscureCardNumber:true,
        obscureCardCvv:true,
        height: 175,
        textStyle: TextStyle(color: Colors.yellowAccent),
        width: MediaQuery.of(context).size.width,
        animationDuration: Duration(milliseconds: 1000),
    ),
CreditCardWidget() also has some optional parameters that let you modify this widget as per your need. Like add a cardbgColor means the user add any color, height, width, obscureCardNumber, obscureCardCvvanimation-duration, etc.
Now, we will be adding a CreditCardWidget()
CreditCardForm(
  formKey: formKey,
  onCreditCardModelChange: onCreditCardModelChange,
  obscureCvv: true,
  obscureNumber: true,
  cardNumberDecoration: const InputDecoration(
    border: OutlineInputBorder(),
    labelText: 'Number',
    hintText: 'XXXX XXXX XXXX XXXX',
  ),
  expiryDateDecoration: const InputDecoration(
    border: OutlineInputBorder(),
    labelText: 'Expired Date',
    hintText: 'XX/XX',

  ),
  cvvCodeDecoration: const InputDecoration(
    border: OutlineInputBorder(),
    labelText: 'CVV',
    hintText: 'XXX',
  ),
  cardHolderDecoration: const InputDecoration(
    border: OutlineInputBorder(),
    labelText: 'Card Holder Name',
  ),
),
In this CreditCardForm(), we will add a formkey. Users can create the final globalkey.
We will add onCreditCardModelChange. In this function, the user can add Strings of cardNumber, expiryDate, cvv, etc.
void onCreditCardModelChange(CreditCardModel creditCardModel) {
  setState(() {
    cardNumber = creditCardModel.cardNumber;
    expiryDate = creditCardModel.expiryDate;
    cardHolderName = creditCardModel.cardHolderName;
    cvvCode = creditCardModel.cvvCode;
    isCvvFocused = creditCardModel.isCvvFocused;
  });
}
We will add a cardNumberDecoration means users can write a card number on this decoration box and show it on our credit card. expiryDateDecoration means users can write an expiry date on this decoration box and show it on our credit card. cvvCodeDecoration means users can write a cvv code on this decoration box, and then the card will allow animated reverse and show it on our credit card. cardHolderDecoration means users can write the person's name on the credit card's front on this decoration box and show it on our credit card. When we run the application, we ought to get the screen’s output like the underneath screen capture.

Credit Card View
Now, we will add a button for validation. When the user fills in all forms properly, the card will be fine; otherwise, they will show some errors.
RaisedButton(
  shape: RoundedRectangleBorder(
    borderRadius: BorderRadius.circular(8.0),
  ),
  child: Container(
    margin: const EdgeInsets.all(8),
    child: const Text(
      'Validate',
      style: TextStyle(
        color: Colors.white,
        fontSize: 18,
      ),
    ),
  ),
  color: const Color(0xff1b447b),
  onPressed: () {
    if (formKey.currentState.validate()) {
      print('valid!');
      _showValidDialog(context,"Valid","Your card successfully valid !!!");
    } else {
      print('invalid!');
    }
  },
)
In the RaisedButton(), we will add the text “validate” and wrap it to the container. onPressed method, we will add if fromkey is validated, then print valid and open a _showValidDialog(). Otherwise, they will give an error.
Now, we will define _showValidDialog()
Future <AlertDialog> _showValidDialog(BuildContext context, String title, String content,) {
  showDialog<AlertDialog>(
    context: context,
    builder: (BuildContext context) {
      return AlertDialog(
        backgroundColor: Color(0xff1b447b),
        title: Text(title),
        content: Text(content),
        actions: [
          FlatButton(
              child: Text(
                "Ok",
                style: TextStyle(fontSize: 18,color: Colors.cyan),
              ),
              onPressed: () {
               Navigator.of(context).pop();
              }),
        ],
      );
    },
  );
}
In this dialog, we will add context, return an AlertDailog(). Inside AlertDialog, we will title, content, and actions. When we run the application, we ought to get the screen’s output like the underneath screen capture.
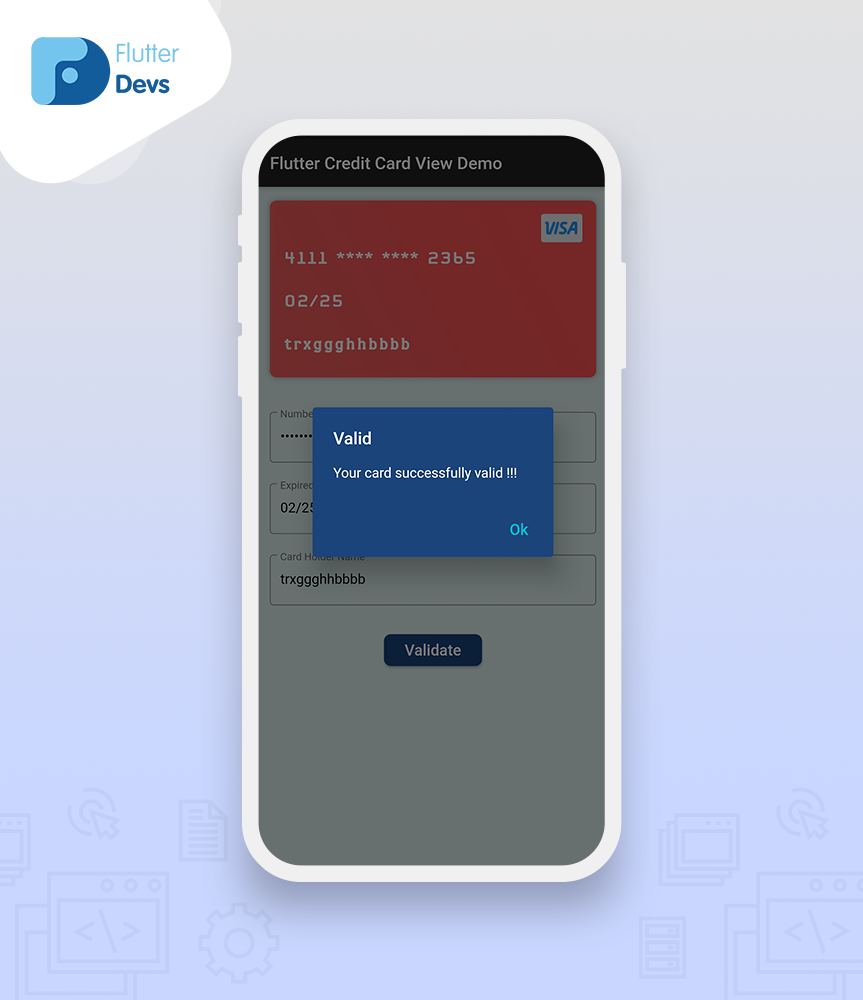
Dialog Box
Code File:
Conclusion:
In the article, I have explained the Credit Card View of basic structure in a flutter; you can modify this code according to your choice. This was a small introduction to Credit Card View On User Interaction from my side, and it’s working using Flutter.
I hope this blog will provide you with sufficient information in Trying upthe Credit Card View in your flutter projects**.** We will show you what the Flutter Credit Card is in the introduction part?. Make a demo program for working Credit Card and show a card detection, validation, animation, and dialog box using the flutter_credit_card package in your flutter applications. So please try it.
❤ ❤ Thanks for reading this article ❤❤